home about popcosmo contact
Showing posts with label diy. Show all posts

Tuesday, March 26, 2013

diy camera strap

how adorable is this camera strap?

to learn how to make it : 


thanks for reading
post signature

Wednesday, August 8, 2012

the lilly locker look

the thing i have the hardest time with at school is keeping my locker neat. i am a really unorganized and sloppy person, and i just can't fix it! every year my friends have an intervention, because it gets to the point where i can't close my locker and i end up being late to class. i've also hit numerous people on the head with my books, because they fell out of my locker when i opened it.
 it's a problem, but it's not a problem i'm really willing to fix and there are no "unorganized anonymous" groups where i live. 
its kind of fun having a messy locker though, because at the end of the year i rediscover lost things. last school year i found a pair of socks and a cute j.crew sweater (that's just in the fashion category)! 
just because i'm a messy person, doesn't mean i don't love my locker to look cute! the easiest part for me to keep looking cute and neat(ish) is the inside of the door! because i'm a lilly lover, i decided to make these ADORABLE little flag type things to hang at the top of the door. i also went on tumblr and found a few cute quotes a pictures. and lastly i went on Facebook and picked out my favorite pictures to put inside! 
so here's a little tutorial on how to make the flags! i think that a larger size of these would look absolutely adorable on a wall in your room, or if you're going into college then these are a great way to cover your ugly dorm room walls! 

top left -- gather your supplies! you'll need cute paper (i printed 4x6 lilly prints and cute them, but change the size depending on what you're making it for)
top right -- punch two holes on the left corner and two holes on the right corner
bottom left-- punch all your triangles!
bottom right-- measure the lanyard (note, i think ribbon looks cuter, but i didn't have any to match)
p.s. ignore the nail polish, i know its atrocious 


top -- weave the lanyard through all the holes!
bottom -- knot of the ends


honestly, this is one of the easiest crafts i have ever made, and it's so cheap yet so so so cute! 

finished look if you do two rows


finished look with one row
obviously i didn't put this in a real locker, because i don't have keys to the school. you would probably need to use five triangles across for a real locker though, so plan ahead! 

do you decorate your locker?
thanks for reading! 
xox

Sunday, July 22, 2012

feelin' crafty & no skill

i'm an obsessive pinner. if you follow me on pinterest, you probably want to unfollow me (but don't actually) because i literally am the only thing you see on your news feed. to my defense though, everything i pin is either a super cute thing, a super genius idea, or a killer way to decorate your house. so i mean it's not that bad of a thing. i think.

anyway, today i was doing my daily pinterest scan and i saw this super cool project with milk, food coloring, and soap. i happen to have all three things, and decided that i was going to conquer a pinterest craft. this craft was the best two seconds of my day. it literally took two seconds to "make", and then after i made it. i think looking at other people picture's is cooler, but if you are in need of wasting two seconds of your day then definitely conquer this pinterest idea. here is the pin that i used, and here is how mine turned out.. 
maybe if you put some special type of paper on top, then it would transfer. but i am just thinking out loud here. 

soy milk works;)


my brother helped me with this project, and once our fun was done he suggested that we bake cookies. lately i haven't been the best baker, so i let him do most of the work. i probably should've supervised because i think he added an extra tablespoon of salt, and an extra handful of cinnamon. needless to say this was a major pinterest fail. these cookies were hands down the worst tasting things. i definitely don't blame the recipe, it was for sure a user error. 
my brother said that we could sell them, because the people who would buy them would only know how gross they are after they hand their hard earned money over.
i told him that we'd probably get sued.
he agreed.
on the bright side, i think the raccoons will like them.
if you would like to have a chance to show me how bad of a baker i am, and try to perfect this cookie, then here's the link. 

they didn't even turn out round, and we meticulously rolled them into perfect little balls. 
what a shame. and waste of time.


yesterday, i saw this pin where someone folded a five dollar bill, and found the hidden stack of pancakes. i don't know whether to blame my naivety or just call myself stupid, but i actually thought this was possible. so, right after i saw the pin i googled "how to make a five dollar bill into a pancake". unfortunately what i was looking for didn't show up. i then googled "how to fold a five dollar bill to see a stack of pancakes". i then found out that you can't actually fold a five dollar bill to see a stack of pancakes, and someone with photoshop and a deceiving mind tricked a lot of pinterest users. or maybe they just tricked me, i'm not sure.
to make myself seem less stupid, i then googled "how to turn a one dollar bill into a shirt". then i followed the instructions from the first link and folded a dollar bill to look like a shirt. it didn't quite work as well as i had planned, but i now can whip out some bad amazing dolla dolla bill origami next time i want to get myself out of an awkward situation.
or get myself into an awkward situation.
that is still to be determined. 

i'd rather not show what it's supposed to look like, you
can just look in your closet and compare it to one of you shirts.
apples and oranges you say?
too bad.   


i think from now on i'll just look at pinterest, and repin everything that i think i can do but actually can't. i'll just tell myself the reason i'm not actually doing anything i see on pinterest is because i'm way too busy watching tv & looking at pinterest  to complete anything.


are you as bad at crafting as i am?
or are you the type of person i'm jealous of, because you have mad crafting skill?


thanks for reading!!
xox

Thursday, July 12, 2012

gold star for me --> i made something from pinterest

i have 92 pins on my "getting crafty board on pinterest. ninety two. that's a lot of craft projects. but guess what y'all?! i actually finally made something! i officially earned my first pinterest gold star. you have no idea how great it feels to actually have made something that i thought was cool. so now i'm cool. pinterest cool.

i'm also weird. blog weird. 

moving on..

i made a t-shirt head band from one of my old and hole-y tie dyed tshirts! the finished product looks super cute, not to brag or anything;) 

at first i was going to do a tutorial on how to make a tshirt headband, but it turns out that i can't do a five strand braid. i had to get my brother to help me. my younger brother to be exact. so i'll show you how i started out, but once i get to the actual making of the head band i kind of gave up on taking pictures. 

so grab a little brother, and get crafting!! 


gather supplies! 
all you need is a tshirt, scissors, a hot glue gun, and i used some makeup that i never use to mark where to cut. 
i just measured the shirt to the length of the scissors, and then marked with the makeup.


next, you cut along your marks, and then cut the shirt so that you have long strips instead of loops.
then, because i can't sew i just hot glued all the pieces together. 
once you have them all glued together you begin your five strand braid.


here's the finished product! 
the reason i'm not showing my face, is because the picture was taken from a weird angle and my nose looks abnormally large.
and because all the focus needs to be on the headband;)


oh and when i connected the headband at the end, i literally hot clued the sides together. so if you can sew, i totally recommend sewing the sides together! 

if this was literally no help at all, HERE is the link to the website that i used!

have you made anything from pinterest, if so what have you made?
thanks for reading!
xox


Tuesday, June 12, 2012

stud muffin

lately i have been lusting over the urban outfitters studded jean shorts. i mean can you spell h-o-t  i-t-e-m?

find these shorts here


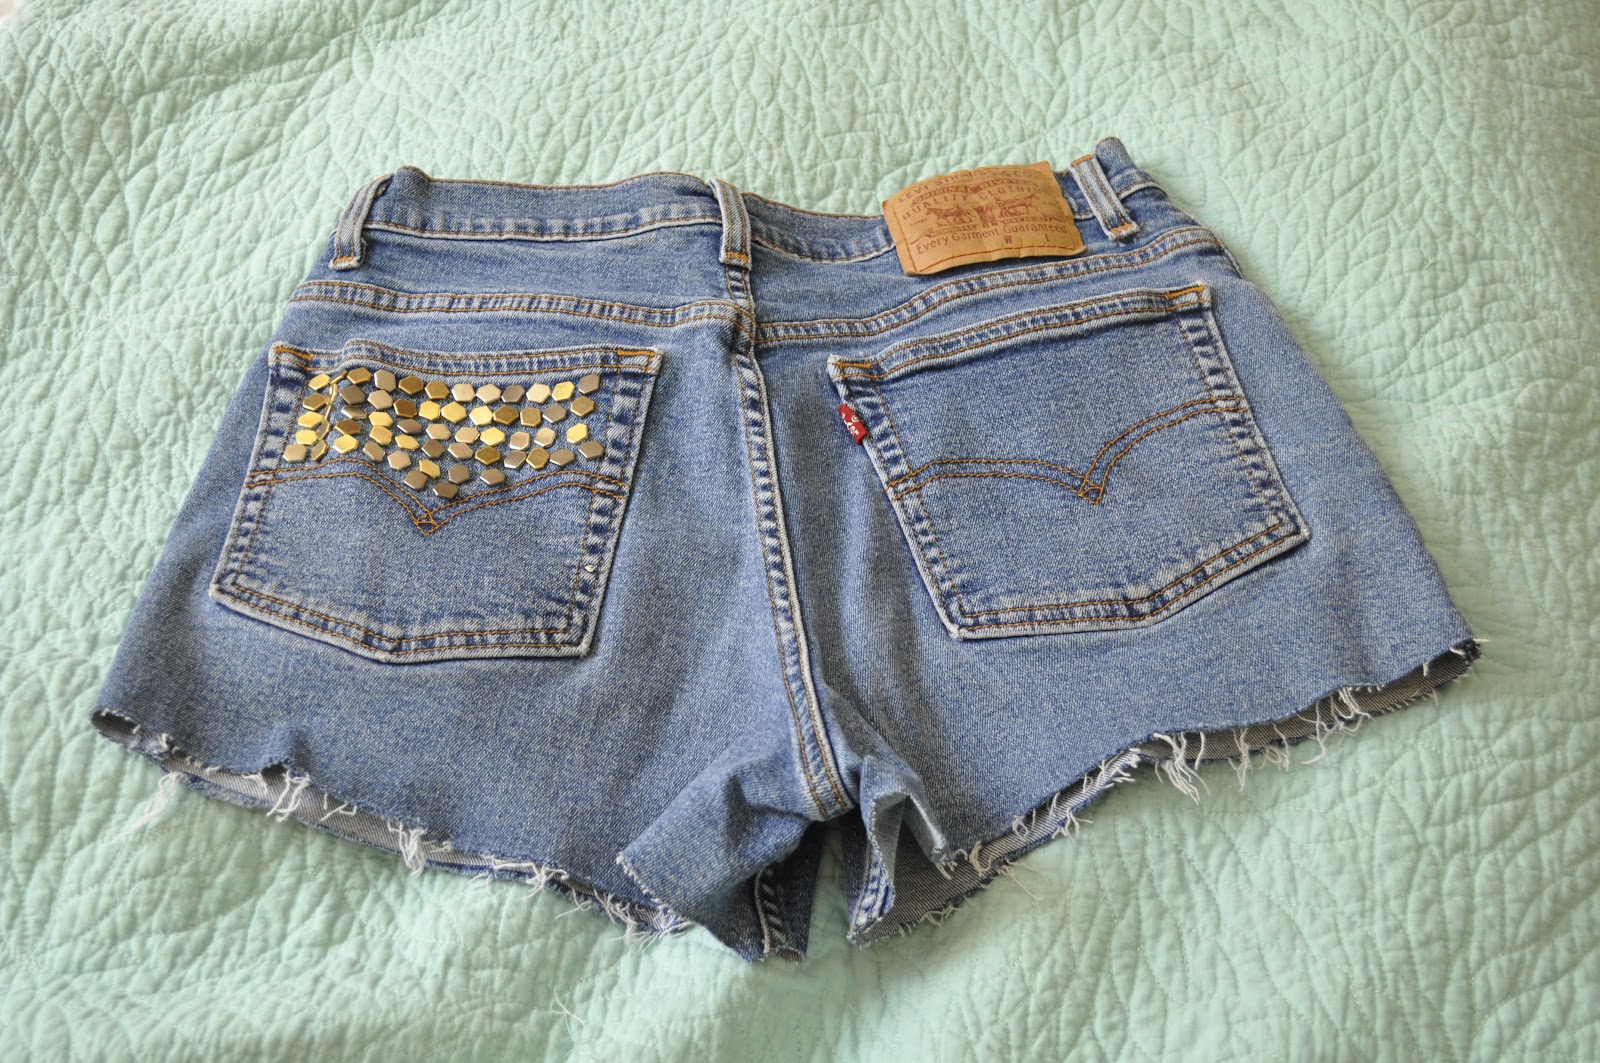
 these are the latest and greatest in the world of tumblr, and i have been looking all over for a pair that is reasonably priced. unfortunately i have looked without much luck, so i decided to make my own. i like to think of myself as a crafty person, but i'm really not, so when i saw ARose186's video on how she made her studded shorts i was in heaven!! through Arose186 aka Arden, i found the Etsy store PurpleDolly. PurpleDolly sells amazingly priced studs for diy projects, and i since i couldn't find studs for a better price i decided to go through PurpleDolly! I received my package of studs in less that a week, and as soon as i got them, i got to studding! as promised in yesterday's post, here is my diy..


step one:
gather your supplies! 
all i needed were my jeans, studs, a pair of scissors (you can also you a small kitchen knife), and my computer for music. 
THESE  are the studs i used, but the store has tons of options! also, i didn't even use the whole bag, which included 200 studs
( another diy i think so;) ) 
 the back of the studs have little prongs, so with the scissors you push the prongs down once the studs are placed through the jeans. its pretty self explanatory once you have them in your possession though! 


step two:
choose where you want your studs to be. the first place i put them was on the outside of the front left pocket. my personal style is very minimalistic and classic, so i wanted to stay true to myself when i made these jeans and not go too overboard!
the bottom picture is the finished look of this pocket! 


step three:
choose another pocket that you would like to stud! 
i chose the back left pocket, and decided to cover just the top half. 
the top right picture below, shows what the inside of the shorts look like. 


finished front look:
(i forgot to take pictures, but i also put studs in the right pocket, but i only put them above where the actual pocket starts)


finished back look:


thanks for reading, and if you would like to see more diys let me know!! 
xo chloe 


p.s. throughout the whole process i only managed to poke myself twice! quite an achievement on my part ;)


p.p.s. follow me on instagram and pinterest!!
my instagram username is seebychloe1
my pinterest name is chloe gordon 


Saturday, June 9, 2012

diy high waisted shorts!

            hey ya'll! one of the biggest trends for the summer time is high waisted anything. many celebrities can be found wearing high waisted shorts and/or pants..


also, a new thing that a lot of people have started trying out more and more often is thrifting. personally i LOVE thrifting! it's like a scavenger hunt + shopping, which are two of my favorite pastimes;) within walking distance from my house is a thrift store and yesterday i went in for the first time ever. it was amazing! i racked up with two pairs of jeans (levis and calvin klein) and i also got a cute polka dot top straight from the 50's. i purposely got the jean shorts so that i could try the diy that our intern over at popcosmo tried, and the levi's that i got were perfect material for this diy, and they were only five dollars! here's a little tutorial i made to show you how to cut you'r own high waisted shorts and then how to fray the edges.

1. first things first, gather your supplies! what you'll need is a shoe box, a ruler, a buffer/sandpaper, a washable marker, a pencil, and scissors.
2. try on your jeans to figure out where you want to cut
3. mark with a pencil exactly where you prefer you shorts to end
4.meausre one inch below your preferred point and mark with the washable marker 

5. cut you first leg off and keep it as straight as possible
6. try on your shorts to make sure it's a good length
7. fold your jeans in half and cut the other leg following the guide of your first leg (confusing, i know)
8. try on your shorts again to make sure everything's perfect

(this section is optional)
9.put your jeans on a shoe box or hard surface, like so
10. use your buffer or sand paper and scrape the bottoms of your jeans
11. the finished product!! 
12. a $60 dollar pair from a store, all in all we saved $55 and they look almost the same!